Message rules define, if and when messages are generated. In this article, we'll be talking about the creation of new message rules in QUDE with the help of two three examples. 1st example: simple message rules without conditions

For this example, we create a message rule that generates a new message whenever the outdoor temperature of your facility is 0°C (32°F) or below. The freezing point is relevant for various situations and the structure of the evaluation rule can be used as a template for many other simple calculations.
Step-by-step instructionAdd the data point "Outdoor temperature" to your list of usable data points Drag and drop all necessary bricks into the work surface and combine them Assign the data point to the matching brick Define the outdoor temperature that should trigger the creation of a message rule Combine the outdoor temperature with the left space inside the brick for relational operators and the constant "0" with the right space. Set ≤ as a relational operator. Link the whole combination to the result brick. From now on, a message will be generated, whenever the outdoor temperature is 0°C (32°F) or below.
- Save your settings
2nd example: the annual limit of refilled refrigerant has been exceeded
 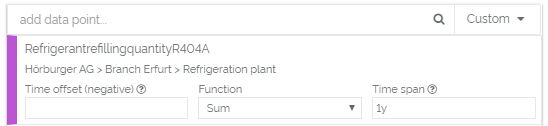
We create a message rule that notifies you when the annual limit of refilled refrigerant has been exceeded. The limit is the equivalent of the expected amount of refrigerant that should be refilled every year. An excess of this value usually indicates a problem, such as a leak. For this calculation rule, we use the following logic: The property "Filling quantity" (refrigerant_quantity) describes the tank's holding capacity. 20% of it are equivalent to the usual annual refilling quantity that we'll use as a limit value. That's why we divide the refrigerant quantity by 5. In order to get the annual refilling quantity, we choose the function "Sum" and time period "1y" (1 year) for the chosen data point in the list. With the help of the message rule above, a message is generated once the annual refill quantity is more than 20% of the tank's capacity.
Step-by-step instruction- Add data point "Refrigerant refilling quantity" to the list of available data points
- Add the property "Filling quantity" to the list of available properties
- Drag the following bricks onto the work surface:
- Result
- Relational operator
- Basic calculation operations
- Property
- Numeric data point
- Constant
- Assign data point and property to their matching bricks
- Configure "Annual refill quantity" at the data point
- Choose the function "Sum" at the data point in the list
- Choose "1y" as the time range
- Define a limit value for the refill quantity
- Add the brick for properties to the left side of the one for basic calculation operations
- Add the constant brick to the right side and change its value to "5" to get 20%
- Choose ÷ as the calculation operator
- Add the data point and limit value to the relational operator
- Add the data point bricks to the left side of the relational operator brick
- Add the limit value calculation to the right side
- Choose > as the operator
- Link the whole calculation to the result brick
- Safe settings
3rd example: the ventilation system is switched on outside of opening hours

For the second example, we would like to generate a calculation rule, whenever the ventilation system is switched on, even though the matching store is closed. This calculation rule can help finding faults in the system. The data point or the activity status can also be switched with various other similar data points, if you would like to analyse other time-dependent values. For this calculation rule, we'll be using the following logic: When using conditions with a further outcome, you define a condition and two possible outcomes that can be calculated. In the case of message rules, this setup is often used to either create a message rule, or not. The constants "true" and "false" express this logic. A "true" result will generate a message rule, whilst "false" won't create one. The condition consists of two components: the activity status and the opening hours. The condition for opening hours is defined in the schedule brick. We use the time outside the opening hours as a condition by setting the schedule brick to "is not active" ("active" would mean during the opening hours). The second condition verifies the activity status of the ventilation system. The activity status is a boolean data point and therefore only has two values: "true", which means that the system is switched on, and "false", which indicates a switched off system. The relational operator veryfies, if the system is switched on by equating the value of the data point with the boolean constant "true". The system is switched on whenever the values are equal. The brick for boolean operators defines with "and" that both conditions have to be "true" to generate a message rule.
Step-by-step instructionAdd the data point "activity status" to your list of usable data points Add the facility property "opening hours" to your list of usable properties Drag and drop all necessary bricks into the work surface and combine them Used bricks: One brick for conditions with further outcome, one for properties, boolean data points, schedules, relational operators, boolean operators, two result bricks and three constants
Assign the data point and property to the matching bricks Set the conditions at "if": The system is switched on outside the opening hours The condition of the message rule consists of thee components: Opening hours, activity status and the combination of these two by a boolean operator. To define the opening hours, link the property brick to the free space withing the schedule brick. Choose "is not active" to get the time outside the opening hours as the condition. Link the activity status to the left space inside the brick for relational operators and the boolean constant "true" the to right space. The relational operator is =. The condition is true and the system is switched on whenever the boolean data point equals "true". Link both combination to the free spaces inside the brick for boolean operators. Select "and" as the operator. Link the whole combination to "if" at the conditional brick. Now, both conditions have to be true, to trigger what is defined at "do".
- Define at "do" that a message should be generated
- Link a result brick together with the boolean constant "true" to to conditional brick at "do".
- A message will be generated, whenever the condition is "true".
- Define at "else" that a message should not be generated
- Link a result brick together with the boolean constant "false" to to conditional brick at "else".
- No message will be generated, whenever the condition is "false".
- Save your settings
|