Mehrere Facilities eines Typs können durch den Import einer CSV-Datei ganz einfach auf einmal angelegt und aktualisiert werden. Neue Projekte Accounts in QBRX erfordern oft das Anlegen sehr vieler Facilities. Damit nicht jede Facility einzeln hinzugefügt werden muss, ist es möglich, gleichartige Facilities massenhaft als CSV-Datei zu importieren. Auf die gleiche Art und Weise können mehrere Facilities bei bereits bestehenden Projekten bestehendeFacilities gleichzeitig aktualisiert werden. Zum Beispiel dann, wenn Eigenschaften wie Öffnungszeiten bei mehreren Shops auf einmal geändert werden müssen. In diesem Beitrag wird erklärt, wie der Import von Facilities zum Anlegen und Aktualisieren via CSV-Datei funktioniert und was beim Format der Dateien zu beachten ist.
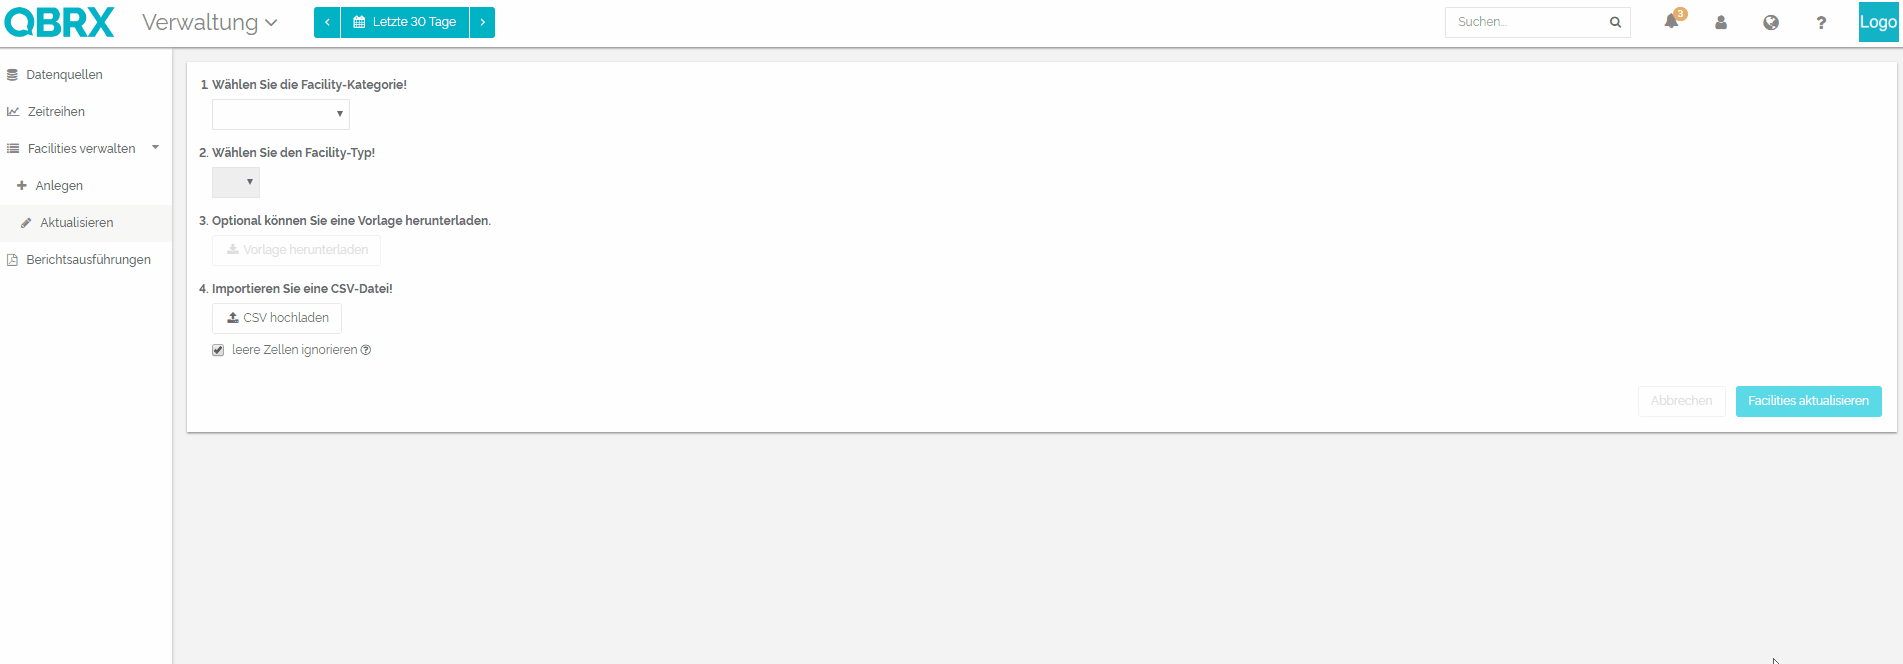
1. Wie kann ich Facilities via CSV Anlegen und Aktualisieren?- Öffnen der Facility-Verwaltung im Verwaltungsbereich
- Begeben Sie sich über die App-Navigation rechts neben dem QBRX-Logo zum Verwaltungsbereich.
- Wählen Sie bei "Facilities verwalten" entweder "Anlegen" oder "Aktualisieren" aus, je nachdem, was Sie tun möchten. Die nachfolgenden Schritte unterscheiden sich nur in wenigen Punkten bei beiden Funktionen.
- Wählen von Facility-Kategorie und -Typ
- Wählen Sie zuerst die Facility-Kategorie und danach einen passenden Typen aus, welcher den Facilities entspricht, die Sie importieren wollen.
- Es können immer nur Facilities eines Typs auf einmal importiert werden, da sich die Eigenschaftsfelder der einzelnen Facility-Typen unterscheiden.
- Sie können den gesamten Vorgang nur abschließen, wenn Sie vorher diese Optionen gewählt haben!
- Optional: Vorlage herunterladen
- Haben Sie noch keine Vorlage für Ihre CSV-Datei, können Sie diese hier herunterladen.
- Die Vorlage entspricht immer dem gewählten Facility-Typ.
- Importieren der CSV-Datei
- Laden Klicken Sie auf "CSV hochladen" und wählen Sie die passende CSV- Datei hoch.aus!
- Nach erfolgreichem Upload werden Ihnen alle Informationen der CSV-Datei in einer Tabelle angezeigt.
- Optional beim : Beim Aktualisieren: Leere Zellen ignorieren
- Gesetzter Haken: Leere Zellen in der CSV-Datei werden ignoriert
- Kein Haken: Leere Zellen in der CSV-Datei überschreiben vorhandene Felder an Facilities
- Facilities anlegen/ Facilities aktualisieren
- Klicken Sie auf "Facilities anlegen" bzw. "Facilities aktualisieren", um den Import abzuschließen.
- Haben Sie das richtige Format verwendet, färben sich die Angaben in der Tabelle grün und der Prozess war erfolgreich.
- Haben Sie falsche Angaben gemacht, färben sich diese rot und Sie erhalten eine Fehlermeldung am Ende der Tabelle.
- Mehr zu den CSV-Formaten und was bei den einzelnen Angabe zu beachten ist, erfahren Sie weiter unten im Beitrag.
- Ein Klick auf den Pfeil am Ende der Tabelle bringt Sie direkt zur jeweiligen Facility.

- Optional: Fehlermeldung erkennen und Fehler korrigieren
- Bei falschen Angaben, färbt sich die Zeile rot und Sie erhalten eine Fehlermeldung am Ende der Zeile, welche ihnen mitteilt an welcher Stelle eine falsche Angabe gemacht wurde.
- Korrigieren Sie den Fehler in der CSV-Datei und laden Sie die aktualisierte Date im Anschluss erneut hoch.
- Ist die Tabelle grün, waren alle Angaben richtig und Sie können die Facility anlegen oder aktualisieren.
- Sollten weiterhin Probleme bestehen, wenden Sie sich bitte an den Support!
2. Was muss ich beim Erstellen der CSV-Dateien beachten?Das CSV-Format beim Anlegen und Aktualisieren von Facilities ist vom gewählten Facility-Typen abhängig. Deswegen gibt es Unterschiede bei den zu machenden Angaben. Alle allgemein gültigen Angaben werden in der nachfolgenden Tabelle beschrieben, ebenso wie allgemeine Hinweise, die bei allen Formaten zu beachten sind. | Angaben unabhängig vom Typen |
|---|
| parentQRL | Die QRL der übergeordneten Facility. Diese muss absolut angegeben werden. Durch das ändern der parentQRL ist es möglich, die Platzierung der Facility in der Hierarchie anzupassen. Mehr zu QRLs erfahren Sie hier. | | displayName | Der angezeigte Name der Facility. | | Key | Der Key der Facility, welcher zur eindeutigen Identifikation eben jener verwendet wird. Mehr dazu erfahren Sie hier. | | Allgemeine Hinweise |
|---|
| Datumsformat | Folgende Datumsformate werden akzptiert: JJJJ-MM-TT TT.MM.JJJJ | | Dezimaltrenner | Als Dezimaltrenner muss ein Punkt verwendet werden. Beispiel: 3.49 | | Strings | Bei Feldern, deren Werte in der Vorlage mit <...> angegeben sind, handelt es sich um sogenannte Strings. In diese Felder können beliebige Zahlen, Buchstaben und Sonderzeichen eingetragen werden. | | Selection Types | Selection Types sind vom Facility-Typen abhängige Angaben, für die es nur eine begrenzte Anzahl an Auswahlmöglichkeiten gibt. Selection Types sind im Backoffice an den jeweiligen Typen hinterlegt. Sollten Sie gerade keinen Zugriff auf die Möglichen Optionen darauf haben, können diese Felder leer gelassen werden. Die Information kann im Nachhinein direkt an der Facility unter "Eigenschaften" ergänzt werden, wo Ihnen alle Optionen angezeigt werden. In Zukunft werden wir eine Übersicht über alle Selection Types zur Verfügung stellen. |
| 
